
Does your track ever feel too static or lack depth?
Don’t worry — most music producers have bumped into this problem at some point. In this blog post, we’ll explore three ways to address this issue through the use of soundscapes and textures.
What are soundscapes?
For the purposes of this tutorial, a soundscape is a sound (which can be composed of multiple layers of foley recordings, noises, and various forms of synthesis) that slowly evolves with the use of effects.
What is the goal of adding soundscapes?
Depending on the kind of music you make, soundscapes and textures have different levels of importance. For example, if you make ambient music, soundscapes are going to be predominately sitting at the front of the mix, where the listeners can focus their attention on the slow evolution of their sonic layers (a lot of ambient tracks are considerably longer than traditional pop arrangements).
If you make other kinds of music where the focus is on other elements such as vocals in a pop record or intricate bass patches in dubstep, soundscapes often play a much different role. Let’s say you’re working on the bridge of your track, where a lot of the main elements in the arrangement are removed and something new is introduced. Maybe you want to have the lead vocals at the front of the mix, with a repeating percussive loop to keep the tempo going. Adding a subtle, constantly evolving soundscape in the background is a nice way to add that extra depth to the section, while not taking the focus away from the singer.
How to create soundscapes
The bottom line is that no matter the genre, interesting soundscapes will add depth and variation to the track you’re producing. Now that we’ve outlined what soundscapes are and their common use cases, let’s explore some techniques you can use to create them.
1. Add depth using time stretching
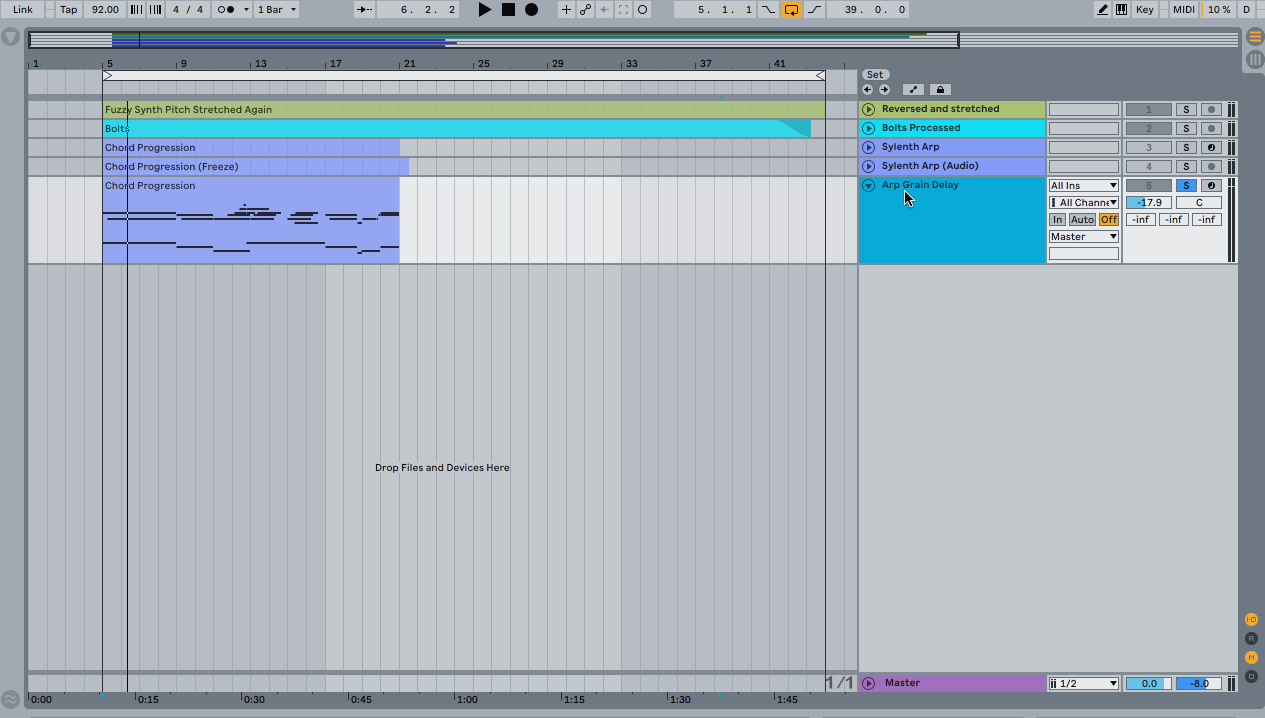
Synth progressions are ideal elements to manipulate to achieve long soundscapes. Let’s say you have a great fuzzy synth sound in your track that follows the main chord progression of the arrangement. The more fuzzy, analog-sounding, and gritty the synth is, the better it will work when you time stretch it. Here’s an example of a great source to process:
As you can hear, the synth is full of movement and fuzz; a time stretch will accentuate these sonic peculiarities nicely. Hear how it sounds when we pitch it down and double its length:
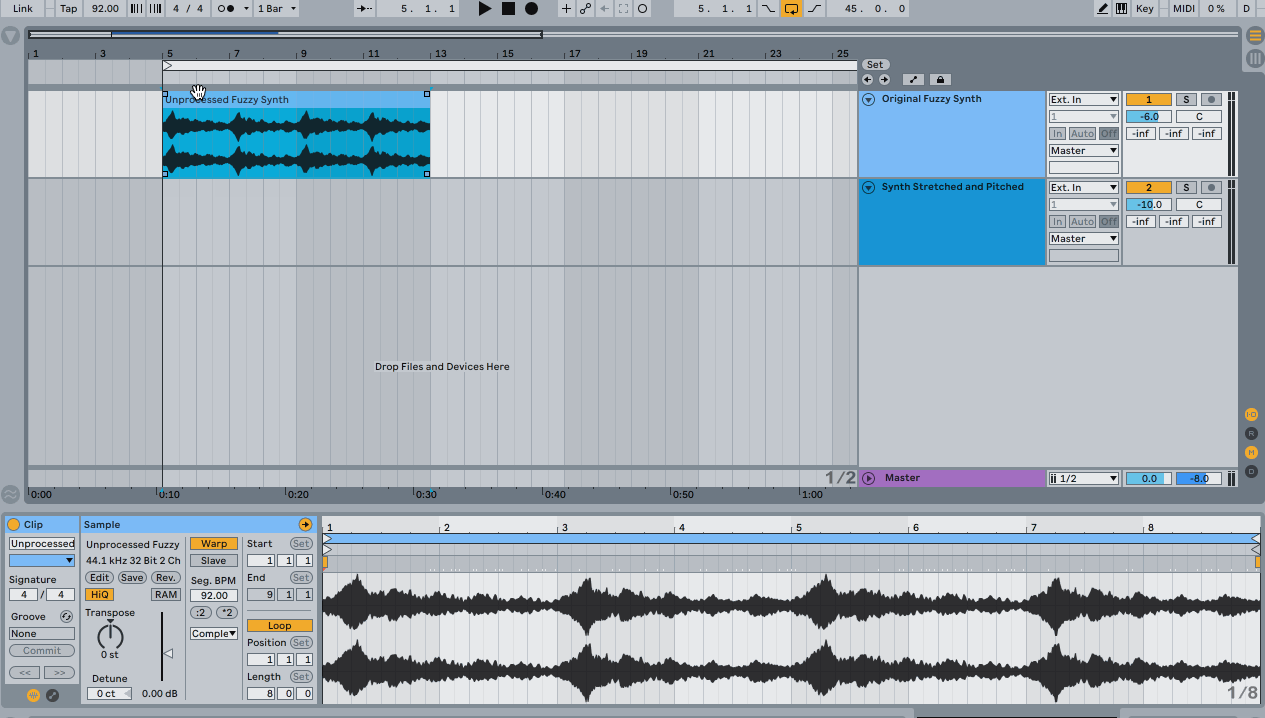
By pitching it down 12 semitones, we also make sure that the soundscape doesn’t interfere with the frequencies of the original chord progression, since we want to create something that acts as a background-filling element.
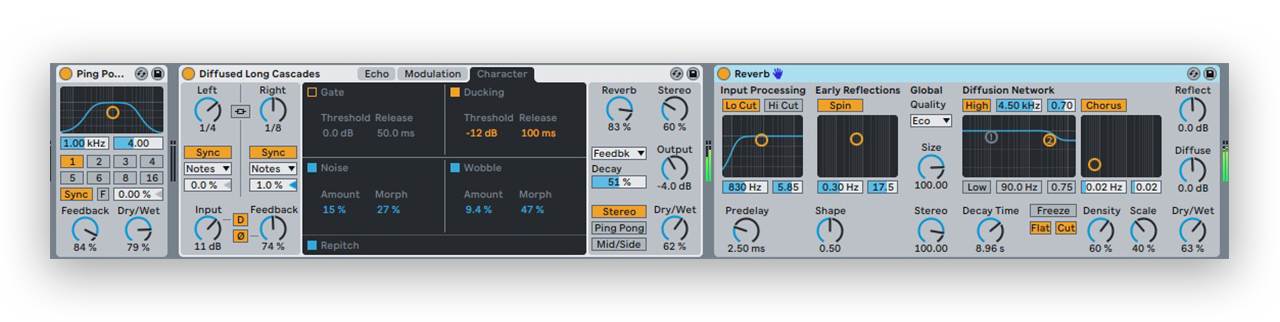
Let’s keep in mind that the goal is to create a deep, washed-out soundscape — next, we’ll have to apply a chain of effects to make it sound wide and evolving. To do this, we’ll add a simple mix of Grain Delay, Simple Delay, Reverb, and EQ. These are all stock Ableton plugins that achieve common effects that can also be found in other DAWs.
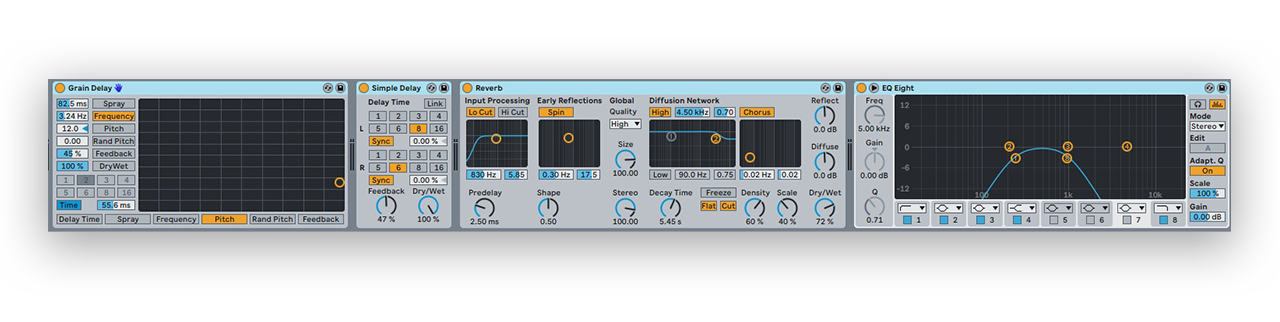
The Grain Delay creates some granular sparkles, which add some additional movement. Inserting an additional delay after this allows us to produce even more of these sparkles that bounce around and continuously evolve our soundscape. To send the sound further back in the mix and even out the sharp accents that the Grain Delay introduced, let’s apply a wet and long reverb, dialed in until the sound is smooth and lush. To top it off, we’ll apply an EQ to remove any unwanted frequencies that might clash with the other elements present in the rest of the track. Here’s how the soundscape sounds after the processing:
To give the soundscape a swelling feeling, we’ll reverse the sound so that a smooth increase in volume happens at the end of each chord:
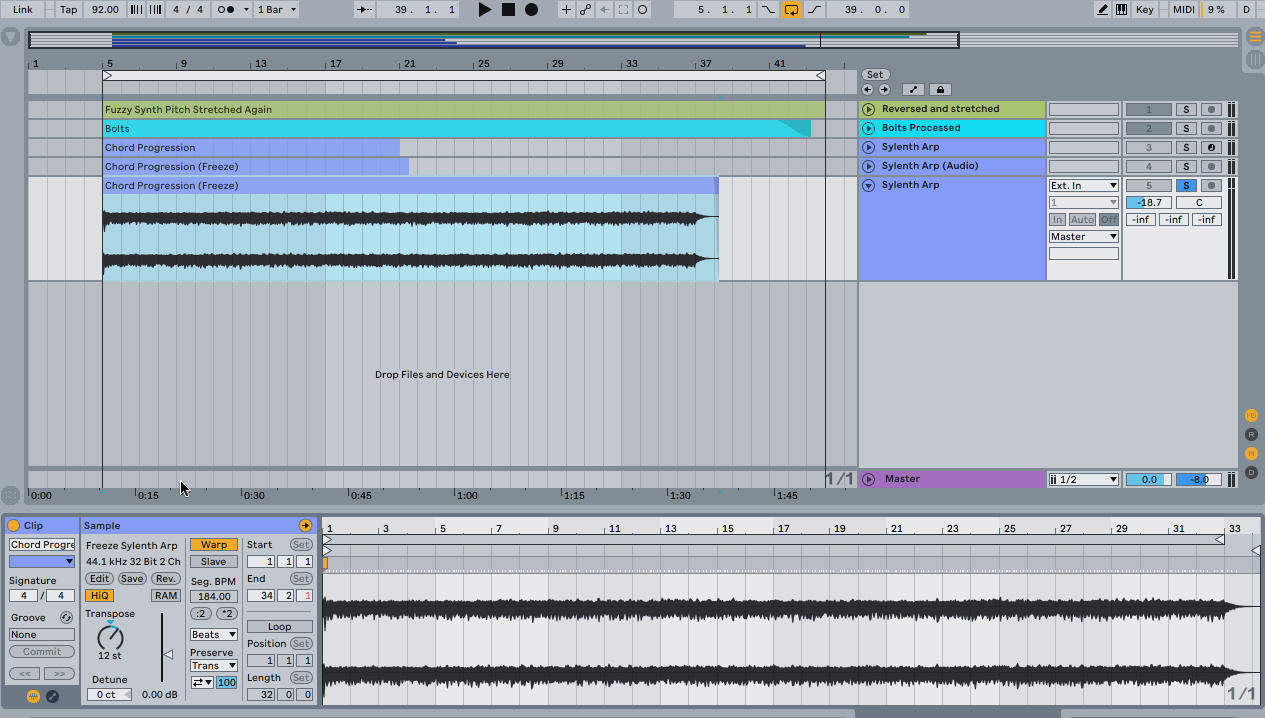
The last step is to stretch the processed sound further to draw out the evolving details of the soundscape. To do this, freeze and flatten the track. Then, with the “Warp” mode off, transpose the sample down 12 semitones. This will also stretch the sound, doubling its length. Here’s the final result:
2. Add foley recordings on top of synth pads
To take our soundscape one step further, we’re going to add a layer of foley recordings on top of it. This more complex layering will make our soundscape even more unique and unpredictable to our listeners. For this example, we recorded a random series of bolts and metal objects:
Without warping the audio file, we’re going to transpose it down 24 semitones, which will conveniently stretch the audio to be approximately the same length as our soundscape. This will make the sound less harsh and recognizable.
Let’s apply some processing to turn this recording into a textural layer. By applying a series of Grain Delay, Ping Pong Delay, Reverbs, Compression, and EQ, we’ll turn this series of noises into an ever-evolving soundscape. Since this sample has no audible key signature, it makes for a perfect accent to our tonal soundscape.
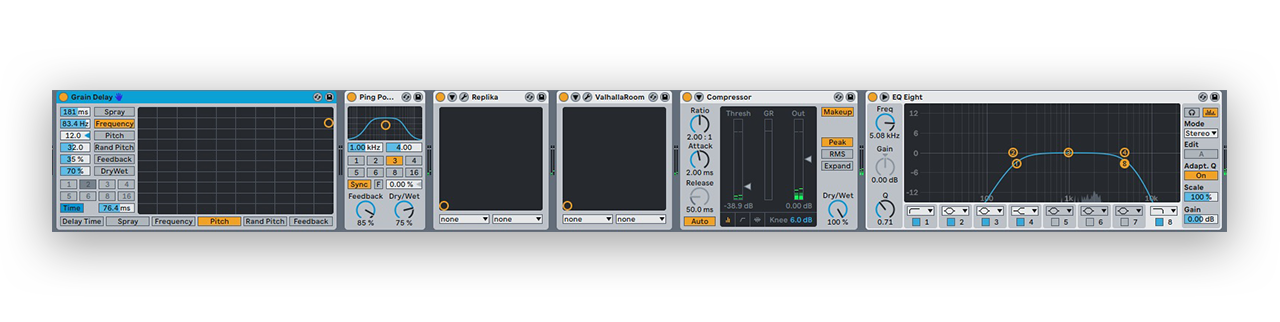
The Grain Delay and Ping Pong Delay cause the sound to constantly bounce left and right in the stereo field, adding movement to the texture. There’s room for experimentation here — the more you push the different parameters, the more the sound will bounce around.
Next, we add multiple reverbs to even out and widen the layer. In this case, we used Native Instrument’s Replika and Valhalla DSP’s ValhallaRoom as our reverbs to generate some variation, but you can replicate this effect with any stock reverb with a long decay and high wet/mix ratio. Don’t be afraid to experiment; some fun parameters to tweak are the reflection and room size settings.
The compressor controls the sound and brings up the reverb tails, while the EQ is used to cut off any unwanted frequencies, mud, and harshness caused by the effects:
Here’s how it sounds layered with our initial soundscape:
3. Add arpeggiated sequences
Now that the core of our soundscape is complete, we can add a few more details to really top it off.
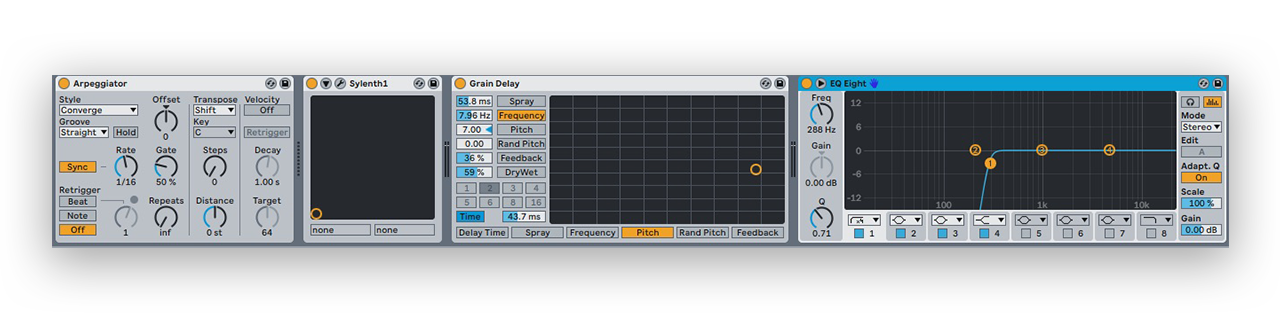
Start by creating a MIDI version of your chord progression. Assign it to a plucked synth, or any sound that has a distinctive attack and a short decay. Now you can either manually turn your chord progression into an arpeggio, or add an Arpeggiator to the MIDI track. This device will create an arpeggiated sequence automatically for you by using the MIDI notes within the chord. For this example, we created a 1/16 converging sequence.
Adding a Grain Delay to the pluck will create a much thicker texture that will become particularly apparent when we stretch it.
To turn this sound into a seamless layer for our soundscape, we have to process it further with the use of delays and reverbs (by now you should have picked up on the fact that to create soundscapes, you need lots of delays and reverbs).
First of all, we’ll completely change the nature of the arpeggio by freezing and flattening the arpeggiated sequence, and then we’ll warp it, stretch it, and transpose it up by 12 semitones.
We’ll now break up the sound into tiny fragments and grains by selecting the Beats warp mode. Select the Transient Loop Mode and lower the transient envelope down to about 20. In this warping mode, Ableton identifies all the transient markers of the sample, and plays each segment to its end and then stops until the next one. The envelope sets the duration of a volume fade that’s applied after each transient, similar to a gating effect — at 100 there’s no fade, while at 0 the volume decays immediately.
To smooth out all these tiny grains and bleeps, we’ll apply a Ping Pong Delay, Ableton’s new Echo plugin, and a big reverb.
This creates a lush bed of sound that occupies the higher frequencies of our soundscape. Since we don’t want this layer to play throughout our soundscape, we’ll just cut out a few parts that we like and scatter them throughout. The end result is a nice complex soundscape that gives the listener a chance to focus on its textural details and evolving movements.
This tutorial represents just one way of creating a soundscape — there are really no strict rules when it comes to designing them. Feel free to experiment with different effects and parameters yourself, and don’t be afraid to try something that nobody else has done before.
Do you have any tips or tricks to share in regards to soundscapes and sound design? Let us know in the comments below.
Explore royalty-free sounds from leading artists, producers, and sound designers:
January 6, 2020


